When a pump seal suddenly fails, production stops. Equipment sits idle. Costs skyrocket. But here’s the thing: most of these failures could have been prevented through proper inspection.
This guide walks you through exactly how to inspect mechanical seals like a professional. You’ll learn what to look for, when to look for it, and what each finding actually means for your equipment.

Step-by-Step Inspection Procedures
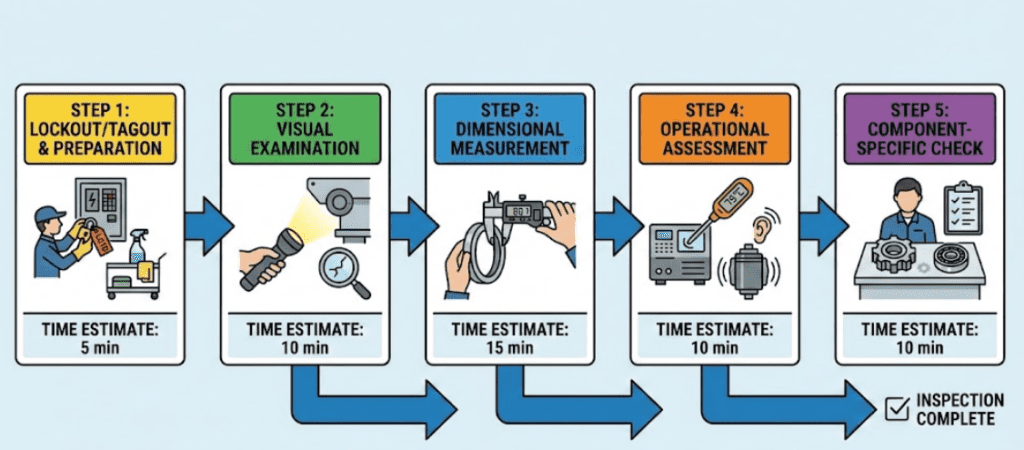
Inspecting a mechanical seal properly means following a sequence. Each step builds on the previous one, giving you a complete picture of seal health.
Step 1: Pre-Inspection Preparation
Before you even look at the seal, you need to set yourself up for success.
First, lock out and tag out the equipment. Never work on a mechanical seal while machinery is running or could accidentally start. This is non-negotiable. Use your facility’s LOTO procedures exactly as written.
Next, prepare your workspace. Clean it thoroughly. Seal components are incredibly sensitive to contamination. A single grain of dust or dirt particle can scratch a seal face and cause failure. Gather your tools before you start, and make sure they’re clean too. You’ll need calipers for measurements, a flashlight for detailed visual work, cleaning materials, and a notebook or tablet for documentation.
Before you begin disassembly, take photos of the current condition. Document any visible leakage, positioning of components, and the overall assembly. This baseline matters because you’ll compare everything to it.
Step 2: Visual and Physical Examination
This is where you look closely at what you’re dealing with.
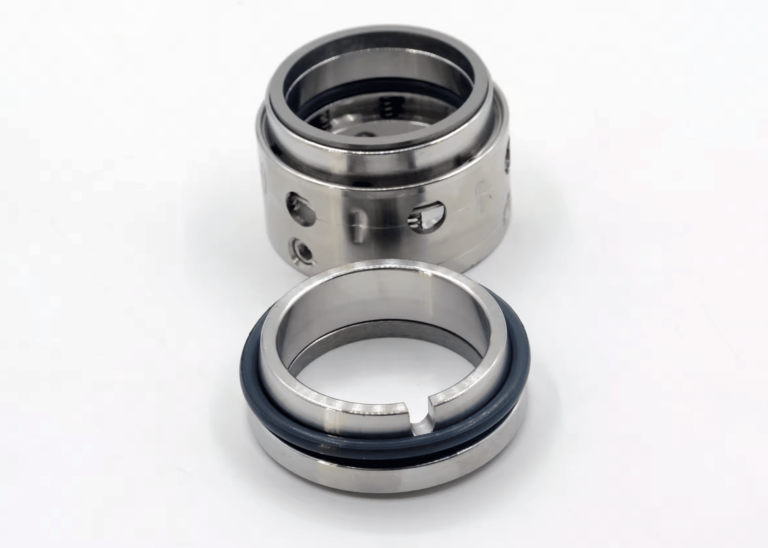
Start by inspecting both seal faces under good lighting. Look at the surface of the rotating and stationary rings closely. Scratches, cracks, or chips are problems. They compromise the seal and cause leakage. Deep grooves or notches typically mean abrasive particles got trapped between the faces during operation. That’s a red flag that your system has contamination you need to address.
Check for carbon dust accumulation around the seal. Carbon dust means your seal faces aren’t getting enough lubrication, or the fluid film between them is vaporizing. Either way, the seal is running hot and wearing fast.
Look at the elastomer components—the rubber elements that create secondary seals. Cracking, hardening, or obvious deterioration means the seal is aging out. That elastomer needs replacement even if the seal faces look okay.
Examine the shaft sleeve where the rotating seal element attaches. Corrosion, pitting, or deep scratches here will damage any new seal you install, so you might need to repair or replace the sleeve.
Finally, check the area around the seal housing and chamber for leakage. Slow seeps are different from steady streams, and both tell you different things about what’s failing. A persistent drip suggests wear on the seal faces. A sudden stream might indicate a component broke or shifted position.
Step 3: Dimensional Verification
Numbers matter. This is where you measure.
Measure the radial width of the sealing surfaces on both the rotating and stationary rings. Compare these measurements to your equipment’s specification sheet. Wear over time reduces this dimension, and if it’s below spec, replacement is necessary.
Measure the compensation spring length. Springs are what hold the seal faces together with the right pressure. If springs have compressed or stretched beyond specification, the seal faces won’t maintain proper contact, and you’ll get leakage.
Check that the seal rings are parallel to each other. If they’re tilted or misaligned, one face will wear faster than the other, creating high spots that cause leakage and rapid degradation.
Write down everything. These baseline measurements become your comparison point next time you inspect. A trend over time tells you exactly when replacement is coming.
Step 4: Operational Assessment
When the seal is running, what’s actually happening?
Check the operating temperature at the seal during normal operation. Seal faces generate friction. Some heat is normal. Excessive heat means something is wrong—either the seal faces are in direct contact (dry running), friction is too high, or cooling isn’t working properly. Most mechanical seals run between 50 and 80 degrees Celsius under normal conditions. If you’re seeing consistently higher temperatures, investigate.
Monitor the suction and discharge pressures your pump maintains. Seals are designed for specific pressure ranges. Operating outside those ranges puts stress on the seal and accelerates wear.
Listen for abnormal noises. A squealing or high-pitched whistle usually means dry running or insufficient lubrication. Grinding or scratching sounds indicate seal face damage. Loud banging or clanking often points to excessive vibration from misalignment or imbalance.
Check actual flow rates and compare them to normal baseline values. A sudden drop suggests seal wear is beginning.
Step 5: Component-Specific Inspection
Now look at individual parts.
The springs should move freely and return to their original position when compressed. A spring that doesn’t return indicates it’s fatigued or has lost its temper. Replace it.
The rotating element should spin smoothly on the shaft with no wobbling or resistance. Any grinding sensation means something is damaged internally.
The stationary element should sit flush in its housing. If it rocks or has play, the mounting is compromised.
The O-rings and elastomer seals should be pliable and show no visible cracking. Brittle, hard, or cracked elastomers have reached end of life.
Common Inspection Findings and What They Mean
Different problems show different signs. Learning to read these signs is what separates competent maintenance from reactive fire-fighting.
Seal Face Defects
Deep grooves or notches on the seal faces mean debris got caught between them during operation. This is a symptom of contamination in your system. The seal needs replacement, and you need to investigate why debris is present. Check your filters, flush systems, and fluid condition.
Blistering appears as small raised bubbles on carbon seal faces. This is thermal attack—the face got too hot and material broke down. It’s a sure sign the seal is headed for failure. The cause is usually dry running or inadequate cooling.
Heat checking shows as fine radial cracks in the seal face, caused by repeated thermal expansion and contraction cycles. This indicates sustained overheating. Look for dry running conditions, inadequate cooling, or operating outside your design pressure.
Scoring or scratching in radial patterns usually means a hard particle was trapped and dragged across the face during rotation. This damages the critical sealing surface and causes leakage.
Performance Indicators
Persistent leakage at slow rates (a drip every few minutes) usually means the seal faces are wearing. As they wear, the gap increases and fluid escapes. This is gradual and often caught before catastrophic failure.
Sudden streams of leakage suggest something shifted or broke—a component came loose, an O-ring failed, or a face cracked. This requires immediate attention.
Temperature fluctuations that change rapidly indicate the seal is transitioning between different operating modes. If temperature swings from cold to very hot frequently, the seal is alternating between adequate and dry lubrication—a destructive cycle.
Abnormal vibration that increases over time shows progressive mechanical problems. Misalignment, imbalance, or bearing wear all accelerate seal failure and should be addressed alongside seal replacement.
Inspection Frequency and Schedules
How often you inspect depends on several factors, but there’s a baseline.
For equipment in normal service—standard operating conditions, mild duty—inspect monthly. That monthly check catches 95% of emerging problems while there’s still time to address them.
For equipment in severe service—high pressure, high temperature, difficult fluids, or critical applications—inspect biweekly or weekly. These seals are under stress and fail faster when problems develop.
For low-priority equipment—secondary systems, spare pumps, or equipment with low consequence of failure—quarterly inspection is acceptable but monthly is still better.
When you inspect, use a standard checklist every time. Temperature. Pressure. Flow rate. Any leakage? Unusual sounds? Vibration? Spring compression. Face condition. Write it all down with dates. This consistency gives you meaningful trend data.
Documentation and Record-Keeping
Create a simple form for each piece of equipment with mechanical seals. Your form should capture:
- Equipment name and ID
- Inspection date and time
- Temperature at seal (digital thermometer)
- System pressure
- System flow rate (if applicable)
- Leakage: none, slow drip, steady, or stream
- Noise: normal or describe what you hear
- Vibration level: normal, increased, or severe
- Spring length (if you’re measuring)
- General condition: good, caution, or replace soon
- Inspector name
- Next scheduled inspection date
File these inspections sequentially. Once you have three or four, patterns emerge. You can see which measurements are trending in the wrong direction. When temperature creeps up 2 degrees per month, your data shows you it’s degrading 24 degrees per year—information that tells you when replacement becomes necessary.


