Every mechanical seal has one part that bolts directly to the pump and holds the entire stationary assembly in place — yet most technicians never give it a second look. That part is the gland plate. It does far more than clamp a seal ring against the stuffing box. The gland plate is a pressure-retaining component, similar to a flange, that also serves as the interface for flush delivery, quench protection, and leak detection. If you skip inspecting it, you are skipping the one part that tells you the most about how your seal is really performing.
What a Gland Plate Does
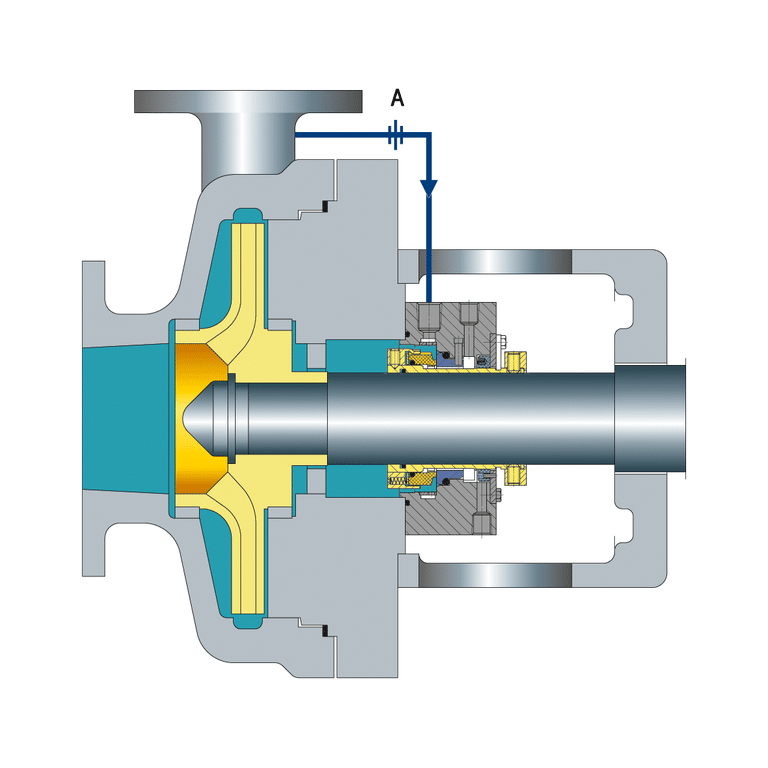
A gland plate connects the stationary assembly of a mechanical seal to the seal chamber. Think of it as a flange — it creates a pressure boundary between the process fluid inside the pump and the atmosphere outside. The gland plate centers the stationary seal face, compresses the gasket against the stuffing box face, and provides mounting points for auxiliary connections.
In a single seal arrangement, one gland plate is enough. Dual seal configurations typically use a single gland plate to contain both the inboard and outboard seal assemblies. The most common mistake I see is treating the gland plate as just a bracket. Overtighten the bolts and you distort it. Ignore the gasket and you create a leak path that has nothing to do with the seal faces.
Gland Plate Ports and Connections
A plain cover plate has no ports. A gland plate typically has two to four machined ports, each serving a specific function in seal support.
Flush Port
The flush port delivers clean fluid to the process side of the seal, close to the seal faces. Its job is threefold: cool the faces, lubricate the contact zone, and wash away particles that would damage the carbon. In API piping plans like Plan 11 or Plan 13, the flush fluid passes through the gland plate’s flush port, in from discharge or out to suction. If these ports plug — and they do, especially in slurry or crystallizing services — the seal faces run hot and dry.
Quench Connection
The quench connection sits on the atmospheric side of the seal, opposite the flush port. It introduces water, steam, or nitrogen to prevent solids from building up on the exposed shaft sleeve. Sugar refineries, chemical plants handling crystallizing salts, and any application where leakage can solidify all need a working quench. Quench pressure stays very low, under a few psi, just enough to keep the area wet or blanketed.
Throttle Bushing and Drain Port
Some gland plates include a throttle bushing — a containment device that forms a tight clearance around the shaft sleeve at the atmospheric end. The bushing channels minor leakage to a drain port instead of letting it spray freely. In Plan 65 arrangements, this drain connects to a leak detection system. Before you start troubleshooting a “leaking seal,” check whether the drain port is routing expected minor leakage to a collection point.
Gland Plate Types and Materials
Three configurations cover most pump applications: flat, piloted, and cartridge.
- Flat gland plates bolt directly to the stuffing box face for standard single seals where no centering pilot is needed.
- Piloted gland plates have a machined register that fits into the stuffing box bore to center the seal on higher-speed or tighter-tolerance pumps.
- Cartridge seal gland plates come pre-assembled with the seal as a single unit, with faces, springs, and sleeve factory-set to eliminate field alignment errors.
For most water and general chemical services, 316 stainless steel handles the corrosion and pressure requirements well. Cast iron works in low-pressure, non-corrosive applications like cooling water loops. Highly aggressive chemicals push you toward Hastelloy C-276 or duplex stainless steel. Match the gland plate material to the process fluid, not just the pump casing material. I have seen plants standardize on cast iron gland plates and then wonder why the seal area corrodes in mild acid service while the pump casing holds up fine.
What to Check on a Gland Plate During Inspection
Most maintenance procedures focus on the seal faces and O-rings. The gland plate gets wiped down and bolted back on. That is a missed opportunity — the gland plate tells you what has been happening to the seal.
Surface Condition
Run your finger across the gasket contact face. Any scoring, pitting, or corrosion there means the gasket cannot seal properly, and you will chase a leak that has nothing to do with the seal faces.
Bolt Torque and Distortion
The most common mistake I see is overtightening the gland bolts. Technicians crank them down thinking tighter is better. The gland plate warps, the stationary face shifts out of plane, and the seal drips from day one. Tighten gland bolts only enough to compress the gasket — no more. If you have been chasing a steady drip on a freshly installed seal, check the gland plate with a straightedge before replacing the seal again.
Port Condition
Look inside every port with a flashlight. Flush ports clogged with scale or crystallized product mean the seal faces have been running without proper cooling. Quench connections blocked with dried residue mean atmospheric-side buildup has been grinding against the shaft sleeve. Blocked ports do not trigger alarms — the damage happens silently.
Gland Plate Dimensions
Before you install a new seal, measure the gland plate bore and bolt circle with calipers. A gland plate that has been remachined or corroded may no longer match the seal drawing. Verify the fit before bolting everything together.
Next Steps
Next time you pull a pump for seal work, spend two minutes inspecting the gland plate before you focus on the seal itself. Check the gasket face, verify bolt torque, and clear every port. The gland plate is not a mounting bracket — it is the pressure boundary, fluid interface, and diagnostic surface of the seal system. Those two minutes prevent the kind of repeat failures that waste a full day.